
YOU CAN ALSO CHECK Solved Auth TLS Problem | Could not Connect to Server |FTP Error | Filezilla Error
Your Website is not running after expire SLL. How to Setup Auto-Renew for Let’s Encrypt SSL Certificates . could not connect VM-SSH, FIRST THINK IS THAT WE HAVE TO CONNECT SSH ON GOOGLE CLOUD PLATEFORM. SSH IS NOT CONNECT THIS IS PROBLEM OF SSL SO HOW TO FIX THAT
FIRSTLY NOW WE HAVE TO LEARN HOW TO FIX IT.
SO.. The first step in this tutorial is to download PuTTY and FileZilla.
YOU CAN ALSO CHECK Solved Auth TLS Problem | Could not Connect to Server |FTP Error | Filezilla Error
Putty is an SSH Key generator. You will use this application to generate a private/public key pair in order to encrypt the connection between your Google Cloud platform instance and FileZilla.
FileZilla is the FTP Client that we will use to securely manage our Google Cloud website’s files straight from our desktop.
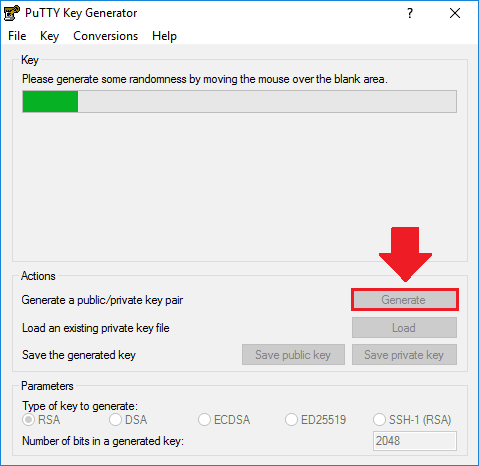
After you’ve downloaded PuTTY Key Generator, open the application and click the “Generate” button to create a new pair of SSH Keys. After clicking the “Generate” button, move your cursor under the progress bar to generate your SSH key files.
After your SSH Key files have been generated, copy the public key text from the top box, and download the private key file by clicking the “Save private key” button.

From the hamburger menu in the upper left-hand corner of your Google Cloud Platform dashboard, navigate to Compute Engine > Metadata > SSH Keys. Click the “Edit” button.

Scroll to the bottom of the “Edit” page, click the “Add item” button, and paste the Public Key text that you copied in Step 3 into the box. Finally, click “Save”.
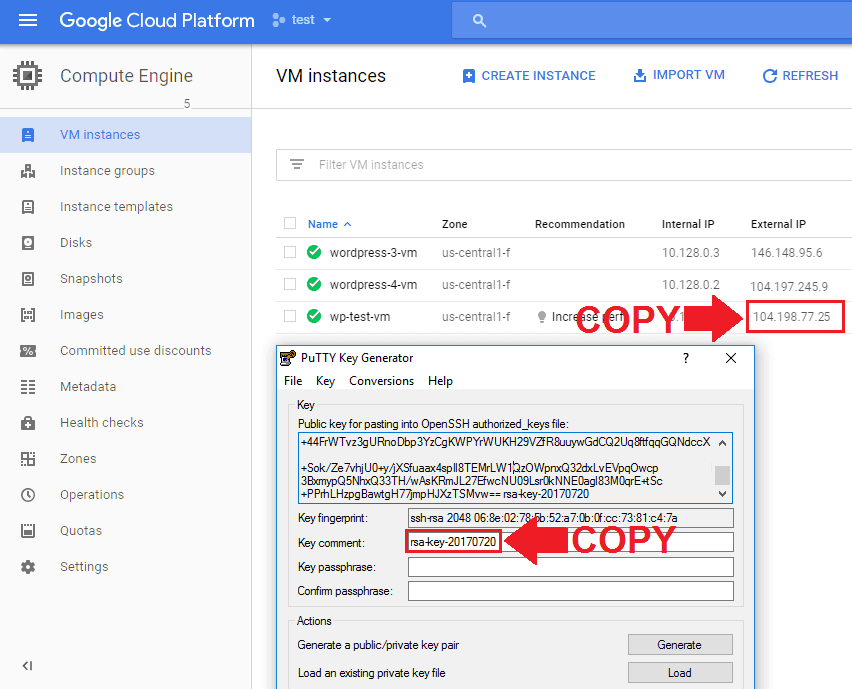
In order to establish a connection between Google Cloud and Filezilla, you will need both the IP Address to your instance, and the username for your SSH Key.
From your Google Cloud dashboard, navigate to Compute Engine > VM instances, and copy the IP Address of the instance you wish to connect to. Also, copy your SSH username, which is displayed in both the key comment section of the putty dashboard and at the end of your public key text.

Back in the FileZilla dashboard, type “sftp://” followed by the IP Address of the instance you wish to connect to. In the username field, paste your PuTTY username.
Lastly, click the “Quickconnect” button.
Navigate to your root directory to your root directory by pasting the directory path in the remote host field.

If you’re running the Bitnami version of WordPress on Google Cloud, your root directory is located at:
/opt/bitnami/apps/wordpress/htdocs
If you’re running the Click-to-Deploy version of WordPress on Google Cloud, your root directory is located at:
/var/www/html
AFETR LOCATE YOUR ROOT DIRECTORY OPEN .HTACCESS FILE
REPLACE
RewriteCond %{HTTPS} =on
TO
RewriteCond %{HTTPS} =off
How to Setup Auto-Renew for Let’s Encrypt SSL Certificates
and upload this file on website root.
now you will connect to your VM – SSH here
For those of you who downloaded the certbot-auto package to a different directory, it is important to find it. If you cannot find the certbot-auto package, you can re-download the package by executing the following command:
wget https://dl.eff.org/certbot-auto && chmod a+x certbot-auto
Move Certbot-Auto Package
sudo mv certbot-auto /etc/letsencrypt/
Use the mv command to move your certbot package into the letsencrypt directory. You can verify that your certbot-auto package has been moved successfully by executing the command ls /etc/letsencrypt/ and seeing if the certbot-auto package appears in that directory.
Now that you’ve moved your certbot-Auto package to the /etc/letsencrypt/ directory, the next step is to open your crontab file.
To open your crontab file, execute the following command:
sudo crontab -e
Now that you’ve opened your crontab file, the next step is to add a script at the bottom of the crontab file which will execute once per week and will automatically renew the SSL certificates if they are about to expire.
At the bottom of your crontab file, you will enter a script which will tell your server to check for certificate renewals once per week, and to automatically renew the certificates if they are about to expire.
For Click-to-deploy or standard Apache users, add the following script:
45 2 * * 6 cd /etc/letsencrypt/ && ./certbot-auto renew && /etc/init.d/apache2 restart
For Bitnami users, add the following script:
45 2 * * 6 cd /etc/letsencrypt/ && ./certbot-auto renew && /opt/bitnami/ctlscript.sh restart
